Autonmous Bird Deterrent System
2022 Senior Design
Mechanical Skills Used:
CAD 3D Modeling, Prototyping, Iterative Design, FDM 3D Printing, Mechanical Machining & Assembly, Kinematics, State Prediction
Electrical and Programming Skills Used:
Arduino Coding, Electrical Circuit Analysis, Soldering, Computer Vision, Python, Systems Integration
Software Used:
Solidworks, Arduino IDE, Open CV
This semester-long project was completed by my senior design team with the help of Professor Dinsmore at UC Riverside. The other members of my team handled the simulation and analysis aspects of the project. I led the hardware and software development.
Every year, birds cause millions of dollars of damage to crops and can introduce harmful parasites into our food supply. The goal of this project was to create a device that can accurately fire a burst of water at a bird and deter it from a home garden. Essentially, I had to build a 21st-century scarecrow.
Before diving into engineering, I like to break down the challenge into components. This helps me to get an in-depth understanding of how I want to structure my design process. Removing the bird and garden application, the core principle of this project is to build a targeting system. First I have to identify a target, then I have to track it, and finally, I need to fire a burst of water at it.
Digging deeper I realized that there is a fourth step in the process. I need to be able to not only know where the target is but also where it is going to be. If I just track the target and fire water at its current position, the target is going to be well past the water stream.
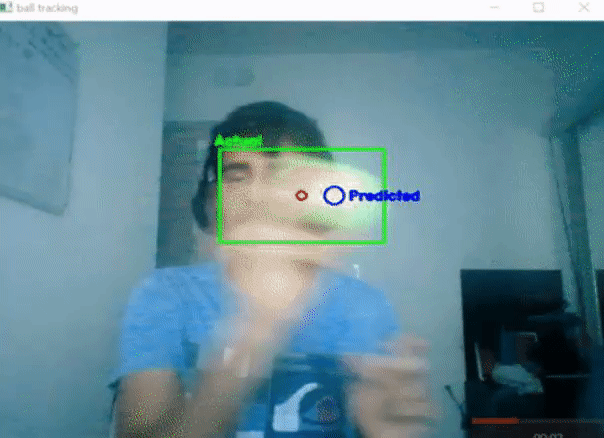
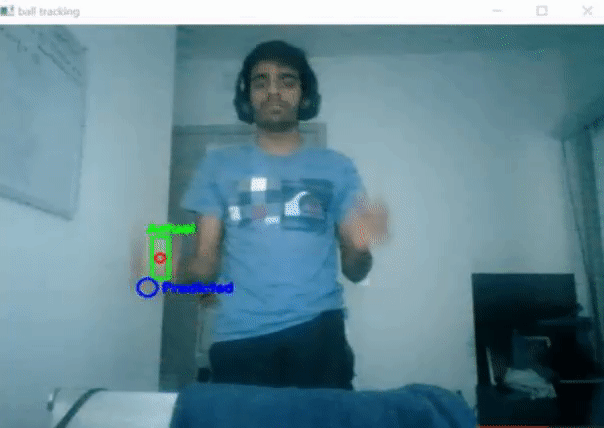
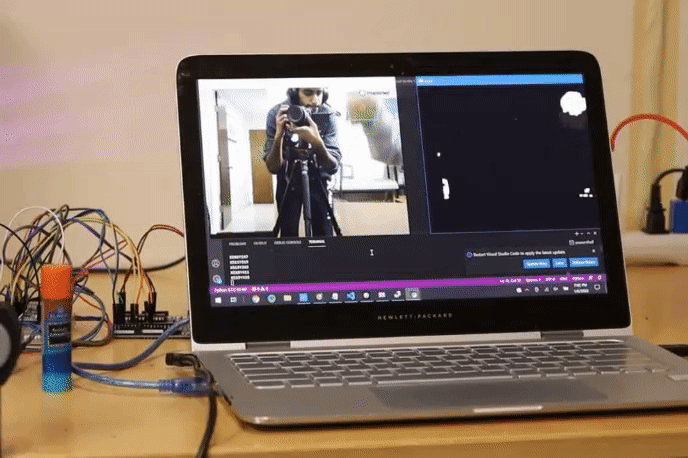
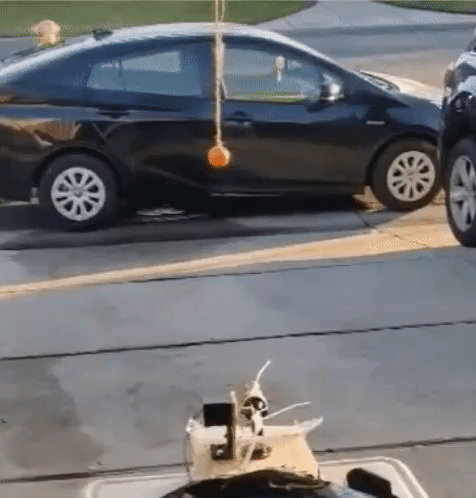
Having established this big-picture outline, I worked through each aspect, the first being identifying and tracking a target. From the start, I knew that computer vision would be a great way of accomplishing this task. I utilized a library called, OpenCV, which provides open-source computer vision tools. For testing purposes, I used a tennis ball as the target. The bright color of the tennis ball contrasts with other objects and makes it stand out when using detection techniques. I was able to very quickly get the detection software running. The green rectangle represents the bounding box of the target. This is essentially the space the target is taking up in the video feed. I can use the coordinates of the four corners of the bounding box, do some simple math, and figure out the center of the object in the video frame. That is represented by the red dot.
You might be wondering what the floating blue dot is. That is the next step of the project, predicting where the target is going to travel. To achieve this, I used an algorithm known as Kalman filtering. Kalman filtering is an algorithm that relies on measurements taken over time to estimate future values. In my case, the Kalman filter algorithm records the acceleration and velocity of the ball during its path through the air. It uses these values to predict where the ball will be given the historically recorded motion data. I can now aim at this predicted location to direct the water ahead of the target so that by the time the water stream reaches the object, it will make direct contact.
So now I have at my disposal a tracking and prediction software capable of giving the real-time position of a target as well as its future position. However, there is one major issue yet to be solved. A garden is a 3-dimensional space. So far my software only takes into consideration 2d information as the camera view is planar. Without depth information, I won’t know how much power to use when shooting water. The solution for this is to use stereoscopic or depth-sensing cameras. However, with a project budget of 500$, I could not afford these types of cameras. Another way that I went about solving the depth problem is using the size of the bounding box. The closer an object is to the camera, the larger it is going to be. I can figure out the size of objects by calculating the area of the bounding box in the software. Thus the lesser the area, the further away an object is. However, this size-based depth algorithm only works if the object we are trying to track is always going to be the same size. Birds come in all different shapes and sizes. If there is a tiny bird in the camera view, the algorithm won’t know whether the bird is small or if it is extremely far away. Given the rapid timeline of the project and the budget constraints, I decided to take an executive decision to forgo depth sensing in the solution. Birds are very susceptible to being scared away. I figured that a burst of water in the general direction of the bird is sufficient enough to scare it away. Direct contact is not needed.
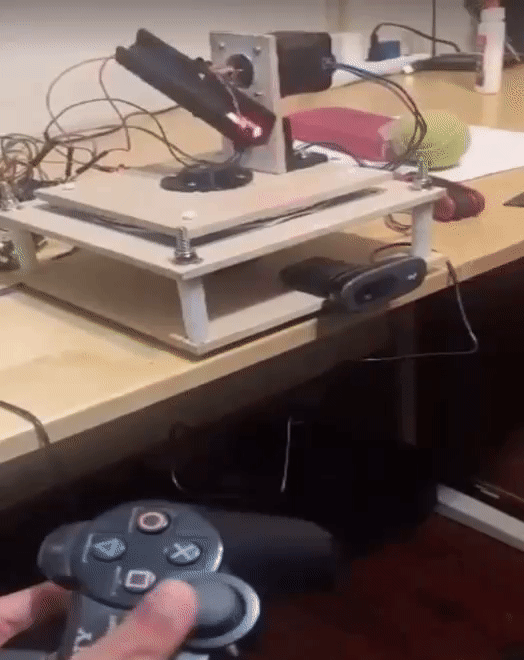
With the software package complete I needed a way to translate virtual coordinates into reality. I needed a way to be able to aim the water stream at the coordinates the software is calculating. I settled on a two-axis turret with yaw and pitch control. I choose stepper motors for their ease of use and position control abilities. By using stepper motors I didn’t need the use of an external encoder or closed-loop software control associated with DC motors. To drive the stepper motors and interpret data from the software, I used an Arduino Uno.
For simplicity's sake, my first prototype just held the stepper motors in place with a 3D-printed fixture. The goal of this prototype was not accuracy or reliability. It was rapidly put together to verify my software and hardware integration because truth be told I did not know if this entire approach would even work. Being a completely untested device, I did not want to deal with the headache of water spraying everywhere while I debugged and tuned the system. So I decided to save the water aspect of this project for later. In place of the water stream, I used a laser beam to provide real-time feedback as to where the turret is pointing without the mess of water. The first prototype worked great in some ways and not so great in others. The hardware and software integration worked well. I could move around the ball and get the laser to follow in pursuit. However, the system was not accurate by any means.
For the second prototype, I focused on calibration, accuracy, and reliability. In my initial prototype, I had a hard time matching the location of the object in my camera frame to the physical position that the turret needed to turn to. The software had no idea where to turn the stepper motor to and would either under or overshoot the desired location. I essentially needed a calibration program to translate the coordinates from the camera frame in the software into position values for the stepper motors to aim the turret.
Going about this logically, I simplified the problem to two different ranges. Let us just focus on the yaw direction for now. The camera view is essentially a grid of pixels 640 by 480. The detection software gives me the pixel location on this grid. In the x direction, this is a number in the range of 0 to 640. The yaw stepper motor has a range of positions from 0-180. My algorithm essentially takes these two ranges and uses a map function to relate a coordinate on the camera feed range to a position in the stepper motor range. I repeat the same process for the pitch axis.
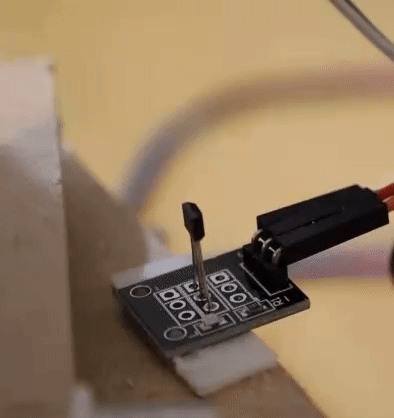
Now that I have mapped the two ranges together I need one final piece of the puzzle in the calibration process. Stepper motors need a reference starting position. You might have seen these in 3D printers where the device has to home with a limit switch. This establishes a starting reference for the motors from which they can keep track of their current position. In my design, I used hall effect sensors. They can be triggered by a tiny magnet to establish the starting or zero position of the turret. I used one for the yaw axis and one for the pitch axis.
In terms of the hardware, I opted for a design that can be easily manufactured using MDF Plates. A lazy susan thrust bearing provides for smooth turret motion.
This prototype functioned both accurately and reliably. The zeroing with hall effect sensors ensures that the turret has the same reference starting position each time. The calibration mapping enables the turret to take in location data from the computer vision software and translate it to real-life movement. The response time is also very fast which is needed for tracking a target as fast-moving as a bird.
With a functioning turret, I devised a means to control the firing of water. I decided to use a solenoid connected to a modified garden hose setup for simplicity. The solenoid restricts water flow until the turret is aiming in the right direction. An off-the-shelf nozzle serves as a way to pressurize and direct a burst of water.
The entire system works together in perfect harmony. The computer vision portion of the software tracks and locates the ball. The Kalman filter predicts where the ball is going to be. When the turret location and predicted location match, the solenoid is triggered to fire water.
This was the progress I was able to make on this project given the short 10-week time frame that I had. In the future, I plan to test this system for its intended application of deterring birds and not just on tennis balls.